Sunday, September 30, 2012

Baked Wontons

Coconut-Peanut Dipping Sauce with Cucumbers


Fried Tofu Squares (to also dip in the Peanut Sauce)


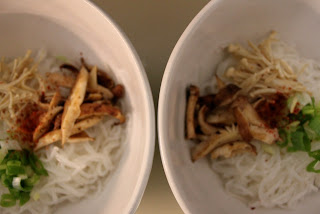
Vegetable Soup with Noodles and Hot Chili Powder


Wontons


Asian food is a new direction for The Piccolo Gourmet. It's not that we don't like this type of food—we just never think to make it, really. And yes, I will be honest, it intimidates me a little. "Stick with what you know", I told myself, "And stick to items with which you are comfortable". The majority of our education and experience has been with Western European cuisine, so why stray from the path? Let's try to make something cross-cultural—fusion—as people like to call it. And that is exactly what we did.


Wonton wrappers: Cute, slimy, fun. You can fill wontons with whatever you like, which is the best part of making your own dumplings. I filled ours with Neufchâtel, minced asparagus, yellow peppers, and a touch of pimentón. Other combinations that I had in my head were: goat cheese with pears, pimientos de pardron with manchego, fava (or white bean) puree with sea salt and herbs. I know, I know, the only Asian ingredient I used were wonton wrappers. But hey, use what you are comfortable with, right? 


I was cooking with friends and Jennifer, who is Korean, taught me that before I bake my wontons (which was what I did) to steam them first. Truth: My wontons came out kind of too crunchy, but not entirely inedible. (We did eat them all.) The steaming would have absolutely helped—great to know for next time—and, yes, there will be a next time.


MATERIALS:
4 oz Neufchâtel
1 cup Minced vegetables of your choice
1 heavy pinch of sea salt
1 dash of pimentón or smoked paprika
1 dash of dried thyme, oregano, garlic, or a mix of all three
1 pkg wonton wrappers


TECHNIQUE
1. Mix all your ingredients together
2. Dip entire wonton wrapper in water and cup this in your hand
3. Drop a small spoon of cheese mixture in the center of the wonton
4. Fold in edges and pinch together
5. Steam these for little bit (not sure how long Jennifer would recommend)
6. Bake in a preheated 350C oven on a greased sheet until golden on the edges, about 20 minutes.

7. EAT!!

The dinner was a full Asian-themed meal that we all shared family-style. We had Baked Vegetable-Cheese Wontons (obviously), Coconut-Peanut dipping sauce alongside Fried Tofu Squares and sliced Cucumbers, Spicy Vegetarian Noodle Soup, and Dessert Wontons that were stuffed with Nutella and Banana. Hmmm... on second thought, this might become a catagory in the future for the Piccolo Gourmet: Themed-Cooking with Friends. I guess you will have to check back in the future!

Sunday, September 9, 2012

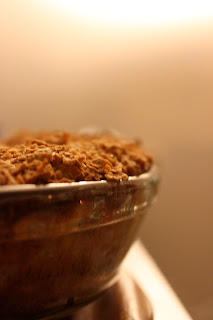
Sweet Cheese Kugel


When the dough from a Börek doesn't work out, what do you do? You save the un-cooked portions, unravel them, use these pieces as noodles. Well, at least that what we decided to do. We made a sweet Noodle Kugel (the versions for this dish are in the hundreds, so pick which ever you find in a cookbook or online that strikes interest. We included the one we used at the bottom of this post JUST in case).

Kugel, a mixture of noodles, cheese and egg, hails from Eastern Europe, so we were staying in the same zone of the world as our project-gone-wrong-but-good-education Börek. Serve this with a Butter Lettuce, Pepper, and Cheese salad, and you have yourself a pretty awesome meal.

 
Butter Lettuce Salad

 
Sweet Cheese Kugel


Ingredients:
  • 16 ounces (400 gm) broad egg noodles, or saved pieces of unsuccessful Börek :-(
  • 4 Tbsp. (50 gm) butter, melted
  • 1 pound (500 gm) cottage cheese
  • 1 package Neufchatel cheese
  • 4 eggs, beaten
  • 1/2 cup sugar 
  • 2 Tbsp. vanilla extract
  • 1 1/2 cup crushed cornflakes (we used whole grain)
  • 2 tsp. cinnamon
  • 2 tsp. nutmeg
  • 1/4-1/2 cup sugar

Preparation:
1. Cook noodles in boiling water according to package direction. Drain and rinse with cold water.
2. In a large bowl, mix the noodles with the melted butter, cheeses, eggs, sugar and vanilla. 

3. Pour into a greased 9x13 inch pan. 

4. In a separate bowl, mix the cornflakes, cinnamon and sugar. Sprinkle the cornflake mixture on top of the noodle mixture. 


Saturday, September 8, 2012

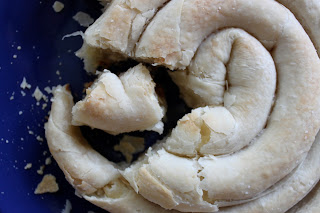
Börek


Making the Dough 


Twisting the cheese-filled dough into a coil.


Bake and break apart to share.

Note: This was a trial and a recipe / technique will follow later in the future. This was extremely difficult to make in a small space and our dining room table (covered with a bedsheet) became our work space. Look for upcoming comments from Charlie -- he made lots of notes on his experiment, but doesn't feel comfortable yet with sharing a recipe. We will keep you posted! 


Tuesday, September 4, 2012

Salade de haricots au fromage de chèvre


I'll be the first to admit it: I'm on a French kick. And I have no idea what initiated this. All I know is that if I have another lettuce-based salad, this vegetarian is going to go off the deep end. I just could not take it any more.

French-style green beans, or hericot verts,  were on sale at the grocery. And they looked gorgeous. Luscious, if that's possible. I walked by, they gave me a wink, and said "Hubba, hubba. Où allez-vous, monsieur"? Into the basket they went.

With Mastering the Art of French Cooking in storage (...psst! The Piccolo Gourmet has moved [!] ), I had to turn to another source. I saw a recipe that was simple enough. And it was. And equally as delicious. It also required 2 of my favorite foods (goat cheese and lima beans), so I was sold.

Steam fresh green beans (12 oz. or so) and set aside. Boil frozen artichoke hearts and lima beans (your desired amount; I used 5 or 6 ounces of each) in salted water . Drain and set aside. Chop up a large handful of fresh herbs and throw them in a large bowl. Add a heavy dash of olive oil, all of your vegetables, and stir to coat. Add salt and a dash of white wine vinegar. Dollop your servings with goat cheese or  fromage de chèvre and a heavy crush of black peppercorns.

Done. And a healthy, quick dinner for after work. Quelle merveille!

Soupe aux tomates de style portugais


The air conditioning is slowly rising from only one of the three vents in our rented apartment. It is 80F outside with 80% humidity. We only have one small fan spinning at its maximum speed. Case in point: It is hot. 

Sticky, sweaty hot.   

My mind went directly to gazpacho for this afternoon's kitchen project, but the hidden goal behind making this meal was that I wanted to use up what was in the fridge. And summer always exhausts me of salads. I needed to make... soup. Hot. Soup. 

Dear Reader, as you are well aware, this is not our first time making something completely ridiculous when the conditions are severe. One might recall the post when I baked a bread in 95 degree weather. Or when Charlie made impromptu pasta from scratch when...well, we were out of boxed pasta and the store was closed. If we want to do something we just do it.

The fridge was bursting with leftover "dippables" from the  hummus I had made the week before. Celery stalks. Carrot sticks. Um, hello? Chop these guys together with some onion and you have instant mirepoix.  Combine this with the forgotten fresh herbs in the fridge and BAM! All arrows were pointing to France. OK. A French vegetable-based soup it was. But wait! I have garlic. And spinach. And limas. Garlic, spinach, and limas are a classic Portuguese combination. OK, so my brain was ending the fiasco here: A Portuguese-inspired, French-style soup. Phew. This will be a fun, creative time in the kitchen. All of a sudden, I don't feel so hot. I guess I'm just excited.

Before I start listing ingredients, I cannot stress this enough, people: Use clean water to make any soup, bean, or rice dish. Leave the tap to water your plants with. I learned this trick while living in Spain and it really does make a difference. Either use filtered water (Brita, Pür, or the like), or buy a bottle of mineral water.


MATERIALS
5 garlic cloves
Half a bottle of young red wine (ex. a French Boujoulais or a Portuguese Douro)
Fresh herbs de provence, off-the-stalk (and minced), about 2-3 Tbsps.
1 large onion
4-5 celery stalks (and their leaves)
4-5 large carrots
1/2 - 1 lb. cherry tomatoes
large can of crushed tomatoes
2 large red bell peppers
5-9 oz. of spinach and/or rocket
8-9 oz. of organic, frozen lima beans
1/2 -3/4 liter of mineral water
1 tsp butter
4 bay leaves
olive oil
sea salt
Food Processor

- Serves 6  -


WHAT TO DO:
Using my food processor made this whole experiment easier and faster. Especially when your small kitchen can barely has the surface area for a cutting board. After you rough chop all the above vegetables, simply chop them finely in the food processor, but seperately. These need to go into the pot (with oil and butter) in a specific order.

1. Onion. Sautée lightly then add
2. Carrots and
4. Red Peppers and
4. Celery and let them cook together with a liberal dash of salt.

When the liquid starts to get released from this mix, add the garlic (mince it), and herbs (de-stem and give these guys a whirl in the processor as well.) 

Turn up the heat and add your wine. Let it reduce almost completely. Then you add your can of crushed tomatoes and processed greens.

While this is in your pan, puree your cherry tomatoes and add those as well. Cover, and let it come to a boil.

When the pot is gently bubbling, add your limas. Cover and let simmer for 15 minutes. When the beans are done, so is the soup. Test for salt.  Enjoy.


Wednesday, July 18, 2012

Sangria de Cádiz

Like other popular summer cocktails in Europe (example: the Italian "spritz"), citrus is the star when making authentic Spanish sangria. The recipe for sangria changes depending upon where one has it in Spain. The commonality, however, is that the added fruit was always oranges. And rightfully so. Valencia oranges are local, super-saturated with juice, and could be mistaken for candy by the sweetness. Apples are a popular  "sangria fruit" in the U.S., however very few apples found their way into my glass in Spain. Culture shock. Perhaps that is purely an American trait?


In Madrid, brandy was added (the bartenders also told me), and gives a very subtle depth of flavor. Thinly-sliced lemon rings clung to the perimeters of  glass pitchers. These were works of art and images I will always remember: Chunky glass vessels brimming with burgundy sangria but contrasted with vibrant yellow rings. Perhaps it is the "artist" in me, but I found this color-combination quite striking. It was like a having a sophisticated "Tinto de Verano" (a popular spritzer of lemon soda and red wine...Charlie's addiction).

Further south, in Cádiz, I detected brandy again ...and with (surprise!) oranges. However, cinnamon was added, and was (perhaps) the best sangria I have ever had. The combination was beautiful. The addition of cinnamon might be a bit scary, but do try it. It is a fantastic surprise to your taste buds. This I found to be the best recipe ...and so distinctly Spanish.

Picking a wine is also very important. Don't just buy "cheap" red wine. Similar to when you cook with wine, you want to add one that you like to drink on its own. You want to avoid something heavy like a Tempranillo. The lighter the better. Try a table wine like a young Cabernet or a Douro from Portugal. These are fairly easy to find. If you can get your hands on a pure, bare-bones, Spanish vino tinto, get it! The label will simply say "vino tinto" or "vino de la mesa". 

Ingredients:
1 single (mini) bottle of brandy
1 bottle of red table wine
Cinnamon sticks (3-4)
(depending upon taste) one-fourth to one-third of a bottle of Lemon soda (Sprite is fine. If you have access to authentic Spanish exports, buy a bottle of "Gaseosa" soda or "Kas" limón) 
1 lemon, sliced
2-3 oranges, sliced


Mix all ingredients (including the cinnamon sticks) in a pitcher. Squeeze some of your citrus juice into the mix as well. Try to mix well enough to get some specks of cinnamon off the stick and into your mixture. Serve in a glass or tumbler with a cinnamon stick as garnish. ¡Qué rico!

Wednesday, July 4, 2012

Pão caseiro integral


I realize that nobody in their right mind would dare turn on their oven in hot, humid, 80F weather. "The norm" never affected us at The Piccolo Gourmet. When we want to bake,  darn it, we are going to bake. What better way to celebrate America's birthday than to cook something from another country? Seriously. The United States is comprised of children from countless generations of immigrants. I find nothing wrong with baking Portuguese bread on the 4th of July; it is (perhaps) just as patriotic as baking a southern Pecan Pie. In addition, at this time last year, I was roaming the streets of Lisboa... and probably with a slice of pão integral in my bag.

Was it scary attempting this without the help of Charlie? Absolutely. He is the chemist of the family, and knows the science of baking quite well. Our friend Jenny (a professional baker) was also not at my side, which made me sweat even more. However, the trial went well, and the secret that I had found (as with all ethnic cooking) was "time". Oh, and add "patience" to the list as well.

I went for a run while my bread was proofing for the second time (my curiosity had to stop checking on the rising of the dough every 5 miliseconds).  While jogging I thought of my Dad's mom,  mi abuela Chilena. She mothered sixteen children and baked fresh bread every single day. Her kitchen was about the size of ours, and in the summer months, the temperature outside today was not that far off from the campo of Santiago de Chile. How, I wonder, did my grandma do it? Where did she learn how to bake? From her mom--my great-grandmother? These are questions that I am sure others ask of their families and man, I wish I knew the answer!

There are a slough of recipes (receitas) for baking breads from Portugal. This is a culture that is infamous for their mastery of baking. I will refrain from adding the recipe that I used, as it is one of several versions. Simply choose which works best for you. My favorite Portuguese breads (Broa de Milho and Pão da Avó) I will have to try making later when I have the proper flours (and when it is not the middle of summer). For now, pão integral (or whole wheat bread) will do, and trust me, it did. A slice of warm, freshly baked bread topped with olive oil and salt? There is not much else that can get better than that. Happy Independence Day, America. And to all the "Silva"s that I met a year ago, obrigado por essas ótimas lembranças!


Tuesday, June 26, 2012

Aperitivo

Tomato with Spring Pea-Mint-Feta Puree


 Croquetas de Espinaca


Several countries around the globe have a name for small plates before one's evening meal. Greece has mezzes. Spain has tapas. Italy has aperitivo. These plates are meant to be shared, and usually are never too heavy. What better way to start summer than a plate of small bites made from local produce? 

In Italian bars (specifically in Milano),  aperitivo is common and free as long as you purchase a drink. This is also a great travel tip. You are going to want a glass of wine at happy hour,  right? You're on vacation! In that case,  sit at a bar, take a drink, and enjoy a "free" dinner while you are at it. You serve yourself and can take as much as you wish. 

Tonight I could not make up my mind on what to make. Don't get me wrong, I love salads in summer, but if I have another bowl of spring mix I just might go bonkers. While reading Bon Appétit magazine today, I saw a recipe for Mint, Parmesan, and Pea puree. Sounded fantastic. One problem: I only had goat cheese and feta in the house. (How Greek, right?) I figured Parmesan is somewhat salty, so let's swap it for feta. Of course I forgot the recipe at work, but how hard could this be? I pureed about 10 ounces of spring peas with a big handful of mint. After adding a dash of salt (for good measure) I gave the processor another whirl. Tasted awesome. Like summer just exploded in your mouth. Trying to cut down on carbs is tough, so I resisted the temptation of grabbing the crackers in the pantry. Instead, I sliced a tomato and stuffed it with the puree and feta. De-lish. But crackers would have been even better!

Perhaps it is because Spain has been on my brain recently (this month is the 1-year anniversary of my returning to the US), but I wanted to eat croquetas just as bad as I wanted to taste those darn peas with mint. Lo que sea, as we say in Spain, whatever. I simply made both. I have taken a stab at making these spinach croquettes in the past, but did not have the energy to even take a look at past posts on my own blog! Having just made the pea puree, I figured why not just chop everything together and throw it in the oven. You know what? It worked. I love it when that happens. 

One of the best things about these two aperitivo dishes is that the materials are minimal. Fresh, simple ingredients always make the best-tasting food. Have a go at these, and trust me, both couldn't be easier to make. Happy summer!

SPRING PEA PUREE
Handful of fresh mint
10-12 oz. of frozen spring peas or blanched fresh ones
1/4 cup feta cheese
sea salt
dash of olive oil

PROCESS
1. Puree
2. Serve with feta on crackers and/or sliced tomato 

CROQUETAS
10-12 oz. frozen spinach or 1 bunch of spinach, chopped 
1/2 large onion
1/2 cup of roasted, salted almonds
a couple ounces of the goat cheese of your choice (I used Portuguese Queijo de Castelo Branco)
sea salt
Spanish pimentón or smoked paprika

PROCESS
1. In a food processor, grind the almonds into a fine meal.
2. Sautee the spinach with the onion, both finely chopped. 
3. Add salt, pimentón, and let cool.
4. In a bowl, roll your crumbled goat cheese pieces in the almond meal.
5. Add the cooled vegetables and stir well.
6. Form into patties and bake at 350 for 20-30 minutes. 
7. While warm, sprinkle with an extra dash of salt and pimentón. Serve warm.


Monday, June 18, 2012

French-Inspired Vegetable Soup


We entertained guests last weekend. Our New York City readers (in particular) know the amount of effort this takes: Sightseeing, museum-hopping, souvenir shopping… It is always fun, but it is tough to cram Manhattan in a mere three days. Some might say "exhausting"!

When the sun started to set on Sunday evening, time was all mine once again. To the cutting board I went. I had no energy to grocery shop, but to stand by my sink in pajamas and chop veggies? Yes. This I could do. When all one wants to do is sit on the couch and call for take-out, even the most amateur home cook will try to  gather enough energy to make the smallest culinary effort. At least I think so.

"No energy" (to us at the Piccolo Gourmet) means "soup". Chop, throw in pot, season, done. The fridge was bare, to say the least, but the produce left over from last week was still (somewhat) plentiful. To throw all these items in a pot, warmly called "Fridge Soup", was the decision for a quiet dinner. And you know what? It was delicious. I would never blog something from an exhausted Sunday evening unless I thought it was worth the effort in re-creating. The secret ingredient here is the wine, at least we think so. Julia Child always added a splash or two to her soups. Why mess with the pros, right? Thinking about her, and French soups in particular, I picked out Julia's usual "go-to" herbs (marjoram, tarragon). It was the right decision. And especially since I had a touch of white wine left over from Friday.

(Serves 2)
Ingredients:
4 stalks of celery with leaves
1 small onion
1 bunch of carrots (6-7 medium-sized carrots)
1 red pepper
1 glass of white wine
1-2 large tablespoons of garlic paste (found in most groceries)
1 tablespoon of each: dried marjoram, tarragon, coriander
sea salt
good olive oil

Seriously, this could not be easier.
1. Chop all veggies.
2. Add olive oil to a pot and add your vegetables. After a few minutes, after the vegetables are warmed, add the salt. This will help extract the water from the celery and onion.
3. Add the herbs and garlic.
4. When you start to smell the garlic cooking, add a full glass of white wine, and simmer the wine until the alcohol is burned off, and most of the liquid is gone.
5. Add water (2 cups or so), and puree with a hand blender.

Done.

Sunday, March 11, 2012

Yiyantes Plaki

My parents met on the steps of the Parthenon. Combine this with my university thesis in art history (and my addiction to olive oil), and some people might say that I have always wanted to go to Greece.  This is true. Bistro Parea is one of my favorite restaurants to share mezzes (Greek small plates, similar to Spanish tapas) in New York City. There is a mezze there which I adore: Giant Baked Beans. It arrives at your table gently bubbling, fresh from the oven.  As the steam drowsily rises from this dish, one can smell the scent of parsley and sweet tomato sauce. It is delicious. 
After some research, I found out the Greek name, Yiyantes (Giant Beans) Plaki (oven-baked), which Parea does not note on their menu. I was craving this all day, but a lazy Sunday doing laundry does not equal getting on the bus to the East Side. The solution? Let's try to make this at the Piccolo Gourmet, which (dare I say) turned out quite like the dish at Bistro Parea.
To start, what I like best about this dish is how fresh it is. I cannot emphasize this enough. It is not over seasoned, has minimal ingredients, and is truly delectable in its simplicity. Many recipes for this dish exist in cookbooks and online, but one recipe in particular resembled my memory of the restaurant. 
2 cans of Large Lima Beans or Giant White Beans (or use frozen)
1 small onion, minced
1 stalk of celery, finely minced
Handful of Fresh Parsley
5 cloves of Garlic, thinly sliced
2-3 cups Tomato Puree
olive oil
sea salt
tsp of sugar
The ingredients are simple. Constructing the dish is simple. It is a meal that just makes you feel warm and cozy all over. Mince the celery and onion. Slice the garlic. Put these three  items in a sauce pan with oil with a dash of salt and sauté. Add your fresh parsley and let the mixture simmer. Add the tomato and beans. Put in a pie dish or casserole pan and place in a 350 degree oven. After an hour, take the pan out and try to let it cool before digging in. Serve with a dash of freshly ground pepper and wedges of warm pita bread, if desired. I prefer just a fork. 

Sunday, February 5, 2012

Biscoitos de Mel e Amêndoas

I had just enough honey left from my jar to create something special, and I had the urge to bake cookies, which is rare. Craving honey and nuts, I naturally turned to our cookbook on Greek cooking. While flipping through the pages on our sofa, the sun was coming through the windows, warm on my shoulders. I closed my eyes and savored the feeling. That gentle heat in the middle of winter made me think of olive oil. The sun always makes me want olive oil, even more than I regularly want it. Sweet pastries based in oil have brushed my life several times, and I have always enjoyed them. Oil seems to be the underdog in baking, at least here in America; Butter cannot always have the spotlight. That I definitely learned while living abroad. Why not try it out?

I was convinced I could bake something using as little ingredients as possible, and I wanted to keep those ingredients just as wholesome. The honey was my inspiration after all. I did not want to add too much. The science of baking has always been a mystery to me. Turning to an American classic, Betty Crocker, I looked up the simplest cookie recipe available for science and ratios. I converted the fats and ingredients to those that I wanted to use. Thanks to Seabra, our Portugese grocer across the street, I am ever so lucky to have imports from Portugal. I miss Lisboa. There is no doubt that the capital of Portugal had nuzzled its way into a corner of my heart. On this wintry afternoon, the sun was on our side, and there was a little bit of Portugal in our kitchen. At least I like to think so. Eu sinto sua falta, Lisboa.

2 eggs
1/2 tsp baking soda
1 cup organic whole-wheat flour 
1/4 tsp of Mexican vanilla extract 
2 cups ground almonds
2 tbs organic cane sugar
1/3 cup of Portuguese honey
1/3 cup of Portuguese Olive Oil

Grind the almonds with the turbinado. Mix the dry ingredients seperate from the wet. Combine then drop cookies on an oiled baking sheet. Makes about 1 and 1/2 dozen cookies. Apreciá-los! Enjoy them!

Torta di Mele

An easy Italian apple tart, sort of a cross between a pie and a cake, takes less than 20 minutes to prepare and an hour to bake while you finish cooking the rest of your meal.  You can impress your guest with its gorgeous presentation without spending hours in the kitchen.
First assemble your ingredients.  Use an apple that holds its shape during cooking such as a Granny Smith or Cortland.  I would slice your apples slightly thicker than I did.  For a large apple, you should cut each quarter into no more than three slices.
As for preparation, mix your dry ingredients together, then cream eggs, sugar, milk, and butter together.  Combine all wet and  dry ingredients and you should have a very thick, but spreadable batter.   If it’s too thick, thin it down to the consistency of very thick pancake batter with additional milk.   Spread the batter into a greased and floured 9 inch spring form pan then arrange your apple slices in a circular pattern, placing the thin side into the batter.
Dot with two tablespoons of butter and bake at 350 degrees for about one hour; check at 50 minutes by inserting a toothpick into the center.  When the toothpick comes out clean, the torta is done.
2 1/2 cups flour
2/3 cup sugar
3 eggs
2/3 cup melted, unsalted butter + 2 tablespoons unmelted cut into small cubes
grated zest of 1/2 lemon
1 teaspoon baking powder
½ teaspoon ground nutmeg
1 teaspoon cinnamon
1/2 cup milk (may need an additional 2-4 tablespoons)
3 apples peeled, cored and sliced

Preheat oven to 350 degrees. Combine all ingredients except the apples. Mix until smooth batter is formed.  Arrange apples in a circle pattern on top of batter. Remove from oven and let cake cool slightly on wire rack.

Tuesday, January 31, 2012

Baguette Pane Integrale

We both love baguettes but also like whole wheat bread, so why not attempt to combine the two? 
For the first attempt, I used 1/3 whole wheat flour to 2/3 bread flour (high protein).   We used the Kitchen Aid dough hook for the first time and it worked beautifully.   The dough was so perfect that I hardly used any flour to knead it.   One important note is that I needed a bit more liquid to form the dough due to whole wheat flour and bread flour absorbing more water.
The most challenging part was managing the three risings.  
For our next attempt, I will slightly increase the amount of yeast and monitor the temperature of the room where the dough is resting.  Also, I would recommend closely watching the oven temperature.  While the recipe I used stated to bake the baguette at 425 F for 10 minutes, then drop the temperature and bake at 325 degrees.  I will try limiting the initial baking to more like 7 minutes and then dropping to 350 for another 20-30 minutes.   Also, we need a longer baking sheet for the baguettes, but for now we’ll settle for shorter loaves.  It is important to brush the bread with cold water just before baking and every time minutes during baking to ensure you have that classic crisp, crunchy crust. 
Our bread turned out beautiful and tastes wonderful, so we look forward to fine-tuning our results.  
Ingredients:
¼ cup + ¾ cup lukewarm water
1 package dry yeast
1 teaspoon sugar
1 cup whole wheat flour
1 cup white bread flour
1 ½ teaspoon salt
1 tablespoon melted butter
2-4 tablespoons of milk

In a 2-cup bowl, mix ¼ lukewarm water, dry yeast and sugar.  Stir gently and let sit for 15 mins
Melt the butter and look cool.  When cool to the touch, add the melted butter and remaining water to the yeast mixture.

Add the flour to the bowl with the dough hook.   Turn the mixer on low and begin adding yeast/water mixture slowly making sure you get liquid to the bottom of the mixing bowl.   Add a few tablespoons of milk if needed to moisten the last bit of flour on the bottom of the mixing bowl. 

Once your dough is formed, remove and knead until smooth and elastic and no longer sticky.  For first rise, let the dough double, punch down and reform into ball.  Let dough double in size again, form into a baguette and place on lightly greased baking sheet.  Make a ¼ inch deep x 1 inch slashes at 2 inch intervals along the length of the baguette.  Let rise 1.5 hours, brush with cool water and bake. 

Sunday, January 29, 2012

Poivrons à la Grecque

Green bell peppers are (how do I put this?) kind of... unappetizing. Here in America, green bell peppers are part of a standard green salad, but other than that, I cannot think of anything else (off the top of my head) where we eat them. In Italy, green peppers are considered un-ripe, and are not used for anything until turning red. It is a similar situation in Spain. After living there, I can honestly say that red peppers are a standard (like Italy), and green... well... you kind of don't see them. Ever. They go in part of the flavor base of a paella, but it is strictly for the bitterness, nothing more. Red peppers (roasted in olive oil and served cold) were a popular beach-side tapa.

What to do with green bell peppers? For some reason we had bought some, and they just sat there in the fridge. Tonight, fed up with seeing our bizarre purchase on the shelf, I began to sift through our cookbooks on how to use them.

Mastering the Art of French Cooking is always a favorite "go-to" standard. The only downfall to any Julia Child recipe is that you need time. A precious item for a New Yorker. It is a Sunday, I had time, so let's embrace our inner Parisian, shall we? I was shocked to find a recipe in her Vegetable section for Green Bell Peppers! And would you believe ... it is vegan? Like Spain, the peppers are taken cold (or room-temperature). Julia recommends you enjoy them as part of a cold buffet. Um, sure! You simmer them (de-seeded and chopped) in an aromatic broth for 10 minutes. Following this, you remove the vegetable, and reduce the broth until it becomes a syrup-like consistency. I removed the liquid until I had about a 1/4 of a cup. Spoon this (cooled) over the peppers (also cooled). We popped open a bottle of White Bordeaux (Julia would have wanted that) and took her advice of having our Poivrons à la Grecque with a salad. We dressed a bowl of rocket greens with oil, vinegar, and Ile de France peppercorn-crusted goat cheese. Our Poivrons were served on the side, tossed with our syrup-ed reduction. Add a protein of your choice, a slice of crusty bread, and wow! You have a meal!

Serving Green Peppers this way was so delicious. I had no intention of buying them again, but if we do, I know how we are going to prepare them! Check out the recipe in Mastering the Art of French Cooking... Bon Appetit!

Baking in Small Portions

New Year, new diet, right? Are you having trouble suppressing that sweet tooth? If so, we have a fantastic solution: Individual-sized pie pans. These little beauties are the ideal answer to portion control. You can have an incredible dessert, enjoy every morsel, and not worry if it is "too much" or "splurging" because it is an individual portion. It takes much more effort to reach for a second pan-full than cutting a second "sliver" of cake. Charlie baked  Cinnamon Coffee cake this morning, and what a treat it was! Buttery. Light. Brown-sugar sweet. But (more or less) guilt free, because I only had one helping. And one is just right. Go look for a set of individual pie pans or ramekins and enjoy an individual-sized dessert. You'd be surprised at how it can help control "over-doing it".

Saturday, January 21, 2012

Green Salad with Roasted Squash and Apples

Sweet. Spicy. Fresh. For an entree salad, and to achieve your new years resolution of eating more vegetables...try this. Both sophisticated and contemporary, this combination of flavors and textures bids adieu to boring salads. Trust us.

At our supermarket, we have a bin of acorn squash overflowing at the brim. Stemming from a recipe from one of our favorite winter cookbooks, gently tossing our squash in a coating of beet-molasses and salt, we roasted strips of acorn squash under the broiler. These caramelized golden strips get set over a plate heaping with salad greens, tart Braeburn apple slices, and salty grated cheese. Sounds delicious? It is. What brings it together is a Dijon mustard vinaigrette.

Slice:
1 peeled, deseeded Acorn Squash
1 small Braeburn apple
A small wedge of cheese of your choice (Parmesan, Sharp Cheddar, or Feta)

Whisk together:
A tablespoon of good, spicy Dijon mustard
3-to-2 ratio of Olive Oil and Vinegar (We used Spanish sherry vinegar)
Sea Salt
Freshly Cracked Pepper

Other materials
Honey, Molasses, or Maple Syrup
Salad Greens

(This serves 2.)
1. ROAST the squash slices at 400 for 20 minutes, coated in a dash of oil, sweetener of your choice, and  salt.

2. Make dressing

3. Toss the salad greens with the vinaigrette. Add the apple slices and toss again. Slice or grate the cheese on top of the dressed greens and plate on two plates. Top the salad with the warm, roasted slices of squash. And while you are at it, pour yourself a nice, cold glass of white wine. It goes great with this salad, and heck, you're eating a salad right? What's a little glass of wine as a treat?

Monday, January 16, 2012

"Rice" with Spanish-style Peppers


Cauliflower "rice" is ferociously popular in low carb cookbooks, blogs, and recipes. It is a great alternative to real rice, a fantastic option for diabetics, and a way to add even more vegetables to your diet. Heck, you might even fool the kids into thinking it was real rice. So, why all the hype? It's delicious. Really. And seriously folks, you do not miss "the real thing". If done properly, it will make dieters jump for joy, and it could not be easier.

1. Chop 1 head of cauliflower in a food processor (raw, and cut into pieces). What you are looking for is a sand-like texture. Pulse until desired texture is achieved. 

2. Microwave for 4-5 minutes, covered. (Do not add water. Let nature do its trick. The moisture already present in the cauliflower is what steams it.)

3. Fluff with a fork. Add a touch of olive oil, or butter, and a pinch of salt. Yummers.

I wondered how this would transfer into a Spanish context. This recipe was extremely difficult, as we kept on having power outages, but the result was delightful, and you shockingly did not miss the "real" rice. The texture, Charlie pointed out, is closer to a couscous than a rice. Either way, it works.

I caramelized the following:
3 red peppers
1/2 onion
with …
Olive OIl
2 cloves garlic
Handful of chickpeas

…and deglazed the pan with some white wine and a touch of sherry.

Add some chopped olives, a hefty shake of smoked paprika, a dash of salt, and you are done. Serve alongside the cauliflower rice / couscous. 

Sunday, January 8, 2012

Recent Projects

Creamed Chicken in Pinched-Pastry Crust Shells
Three Vinegar Salad Dressing


Paella
Cazuela al Horno de Espinaca con Queso
Baked Banana Pudding topped with Sweet Meringue

Cauliflower Gruyère Soufflé

Mini Cinnamon Pinwheels

Parsley-Ricotta Agnolotti
Sweet Potato Agnolotti
These projects will be further written about, but we wanted to post something to halt our over-extended hiatus. The Piccolo Gourmet has had quite the autumn schedule, but we are back, and happy to start posting again!  As you can see above, yes, we have been busy (and in a new kitchen!). We will expand further on these projects in the future, though today, we are posting tips that we have discovered during our blogging pause.

TIP ONE: As you know (we have posted this in the past), we save our cheese rinds for making vegetarian broth. This is a great alternative to using chicken bones or ham hocks. What we discovered is that when you throw in your saved cheese rinds, keep a fair amount of the cheese on the ends. We recently made a new batch and I had noted that (this time) I had kept a greater amount on the ends as a test. Yes! It makes an enormous difference in flavor. Just keep an eye on it. The rinds (this is experience talking) can stick and burn to the bottom of the pot. You cannot see this because they are covered in broth, so keep a mindful watch on the pot. 

TIP TWO: When making salad dressing, add more than one vinegar and you will be blown away. This sounds simple, but what a surprise in the taste. Try it. We combined the following: balsamic, red wine, and sherry. Wow.

TIP THREE: Try your pie before you bake it. Again, sounds simple, but one can easily loose track of sweetness when you combine other ingredients that contain sugar (i.e. crushed cookies). Now I hear you, can something being TOO sweet be a PROBLEM? Well...yes. We did not know until I had a taste... AFTER baking.

TIP FOUR: Scraps from your pastries ... save them. You can roll out almost anything and make tiny versions of big things you crave, and you know what? Not only are they adorable creations, but two or three are "just enough" when you want something homemade and sweet.

TIP FIVE: Learn to love your broiler. Not only can your broiler save you time in roasting and caramelizing vegetables, if the rack is placed close enough to the top, cheese can get those "restaurant-looking" spots on melted cheese. Patience and practice. Try it.